This page is inspired from one of the most talented mapper I know, Ben ‘Evilmrfrank’ Burkart 😀 His original optimization page can be found here. I use his info as a starting point + information coming from many other sources + my own suggestions based on my knowledge with UE3. I provide some pics so it will be easier for you to found which settings to look at.
You may ask yourself why do you need to optimize your level ? Simple, no matter the size your level is, it will always run better if it’s optimize, providing a smoother gameplay, better FPS, a smaller filesize (a plus for those who play online so they use less bandwidth while downloading your level) and so on.
Optimization is even more important today since levels are much more detailed, no matter how powerful your PC is, every bit of optimization will help in the rendering department. I strongly suggest you go through this list before making your level final so players get the most optimized version 😉
BSP backfaces
– BSP backfaces are surfaces that will never be seen by a player. In your level, many surfaces will end up being covered by a static mesh aka SM or will have a side that faces away from the player at all times. Obviously, you don’t want that surface to consume memory by referencing materials that will never be seen. There are 2 stock materials that can be use to apply on those BSP backfaces. In the Generic browser, both are located in the EngineMaterials package, the first one is ‘BlackUnlitMaterial‘ & the second is ‘RemoveSurfaceMaterial‘.
BlackUnlitMaterial : best to use on surfaces inside the level because it provide occlusion capabilities. Think of a cube that as many cuts & apply this material inside the cube on all the surfaces.
RemoveSurfaceMaterial : best to use on big surfaces at the exterior of the level, like the 6 external faces of a cube because it doesn’t provide occlusion capabilities.
– Go into your level and select backfaces and apply one of the materials. This will tell the engine to ignore those surfaces, no lightmap will be applied. Any surface that has those material applied will not be rendered, hence reducing resources. All you will see is a black surface. By applying those materials, you don’t need to change the lightmap size or disable any other settings for it as those materials does it all for you. Manually you would have to set the resolution to 65536 and disable ‘Accepts Lights’, ‘Accepts Dynamic Lights’ & ‘Force Lightmap’.
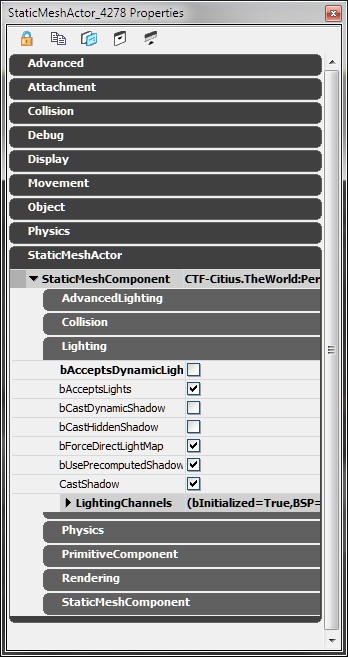
– Dynamic Lights shouldn’t be enabled on a surface that a dynamic light will never touch. Even if a surface is not receiving a dynamic light but has ‘bAcceptDynamicLights‘ enabled it degrade overall performances. Just disable that setting.
– Another tip is to go through your level and check to make sure that materials are only being used once that it’s not all that important to utilize it & use another one that is already used elsewhere. This will reduce the number of textures loaded in memory.
LightMap
– Lightmap can really eat up resources if not set right. For BSP, the default lightmap resolution is 32, for SM, the engine use Vertex model lighting by default unless you force lightmap (which is the better solution). For BSP surfaces that as a bit of shadows, 32 is ok, you can go lower (16, 8, etc) to obtain crisper shadows but will consume more resources, for darker surfaces or very bland in lighting, I suggest you set the ligtmap higher (64, 128, etc). Look at my tutorial on Lighting, vertex and lightmap on BSP & SM that cover this topic in details.
Static meshes (SM)
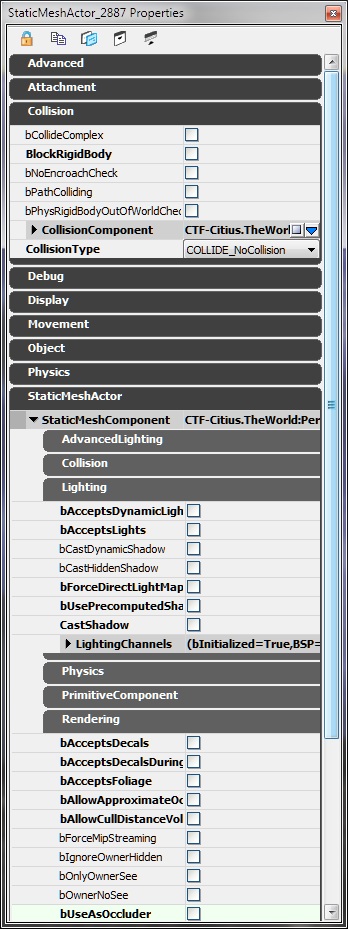
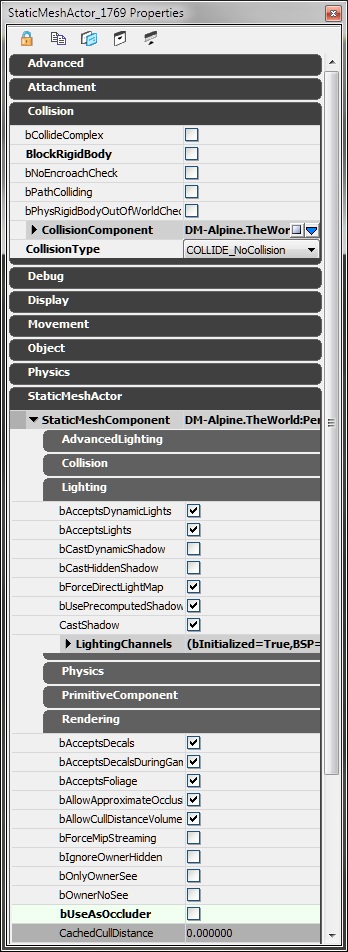
– Same as BSP, Dynamic Lights shouldn’t be enabled on a SM that a dynamic light will never touch. Just disable that setting unless your level is a CTF / VCTF.
– When you are done with your level, in the Generic browser, check the ‘Primitive Stats‘ tab and look for SM that you are using only a few times, 1 – 5 for example. See if it’s really important to keep those SM & look if it can be replaced by a very similar one or even be removed. This isn’t extremely important but if you really want your map to consume less resources this could become useful.
– Make sure there are no SM forgotten. Sometime, they can be some floating around somewhere inside or outside geometry, etc.
SM collisions
– Collisions should be disabled for SM that can’t be touched or shoot through by players / projectiles.
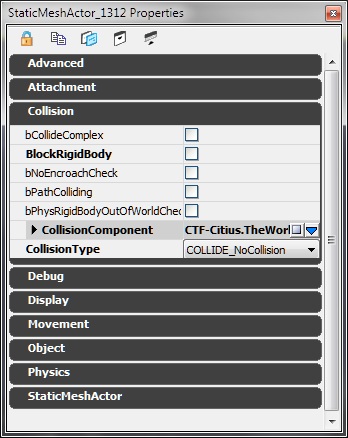
– The collision model of any SM use a certain amount of memory, the more complex it is, the more memory is used. The collisions cover the SM surfaces, which can be describe as an additional geometry on top of the SM. If you have many SM grouped together, it would consume less resources if you turn collision off on all SM & add a blocking volume that include them all & set the collision of the volume to block all.
SM CullDistance + occluding
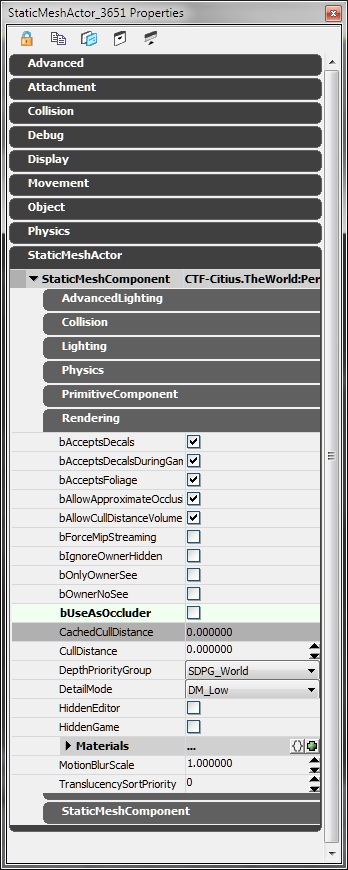
– A extremely important feature that should be used when working with SM is the CullDistance. You can set the CullDistance manually on each SM or use a CullDistanceVolume created with the BuilderBrush that will affect all SM inside the volume. This feature tell the engine to stop rendering the SM from a certain distance. This is extremely useful when your level is heavy meshed. The thing is, be careful with culling values so SM don’t appear / disappear to close from you. Furthermore, the biggest SM will occlude the smallest one, so cull those from far using higher values & for smaller SM you can generally use much smaller values.
Note: a value that as been determined in the ‘CullDistance’ field will be affected by the ‘CullDistanceVolume’ value (which you can see the effective value in the CachedCullDistance field just above). To force your individual ‘CullDistance’ value, you must disable ‘bAllowCullDistanceVolume’.
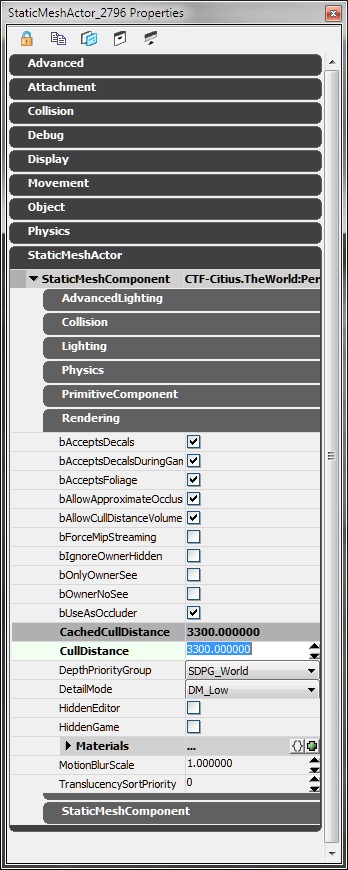
– Another important feature in the SM properties is the occluding option. The occluding option mean that the engine won’t render other SM behind the SM in front. If a SM is too small to occlude anything than turn it off. Think of grass, plants, rocks, tiles, or any small stuff on the ground. This will reduce the number of calculation the engine as to process since it no longer has to decide if a SM will occlude something or not. Just disable ‘bUseAsOccluder‘.
– All SM that isn’t a mover should have ‘bCastDynamicShadow‘ disable (which is the default properties but just in case you don’t know). Unless your using a mover or specifically want a SM to cast a dynamic shadow than this should be disabled. This doesn’t disable casting shadows, just dynamic ones.

SM SkyDome + volumetric
Make sure the sky dome SM as the proper settings which are; no collision, all lighting disable, all rendering disable & don’t occlude neither. This is taking into account your sky material is using the emissive input & not the diffuse input. Do the same for all volumetric SM (light cone) since most volumetric materials use the emissive input.
SpeedTrees
Turn off occluding. Also, be sure to turn off collision if you can’t reach / shoot through the tree. The best solution is to turn off collision & occluding & add a simple blocking volume using the cylinder shape that cover the trunk.
Lighting
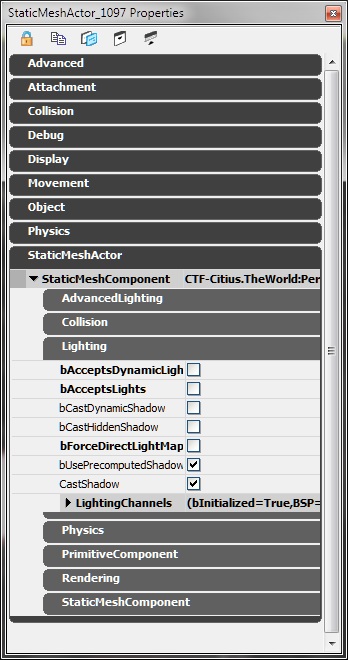
– SM that use an unlit material should have ‘bAcceptDynamicLights’, ‘bAcceptLights’, ‘bCastDynamicShadows’ and ‘bForceDirectLightMap’ disabled. Depending of the SM use, you possibly can also disable ‘bUsePrecomputedShadow’ + ‘CastShadow‘.
– Dynamic Lights consume a lot of resources and can make a huge difference in rendering as bad as making your level unplayable depending on the amount of them. If you use dynamic lights, than remember that the more SM with in the range of the dynamic light, the slower it will render so FPS will be lower. Use them wisely !
Stat commands
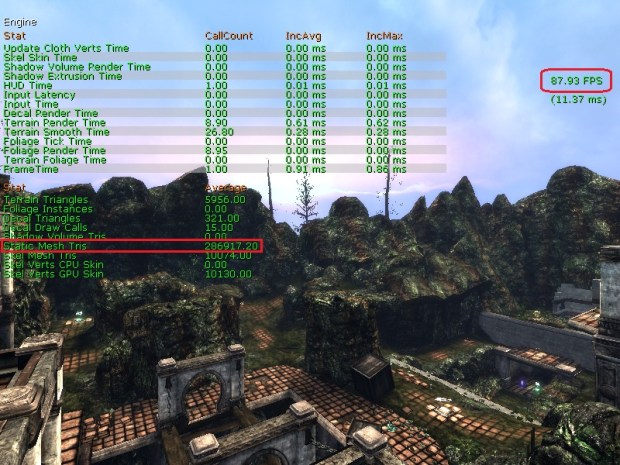
There are various Stat commands available but there is two of them that are very helpful that you can use to really know how many FPS (Frames Per Second) your getting & also how many triangles the engine is rendering. To show up the command line, just press F10 on your keyboard to toggle it.
The first one is stat fps. Your FPS will be showed in the top right corner as showed in the pic in red. Note that for a smooth gameplay, the best range is around 80 – 100 FPS. The more, the better. Note that this technically is not the frames per second that are displayed on your monitor. This value is simply the conversion calculation from the Frame Time in milliseconds. The frame time is how many milliseconds are required to perform the rendering and other engine chores for the current scene. It is simply more relevant to see this value as something meaningful such as 100 FPS instead of 10 ms.
The second one is stat engine as showed at the left which is for displaying the engine frame time. This displays a set of values including the total number of rendered terrain triangles, total rendered SM triangles & many more. About the total amount of rendered SM triangles (in red), try to always be the lowest as possible. A simple way is to fly trough your map in spec mode with a good amount of bots & look the rendered SM triangles stat. If you reach 700 000, you’ll start to have trouble. Try NOT to reach 700 000 or you will be force to optimize your map like a maniac to keep it playable !
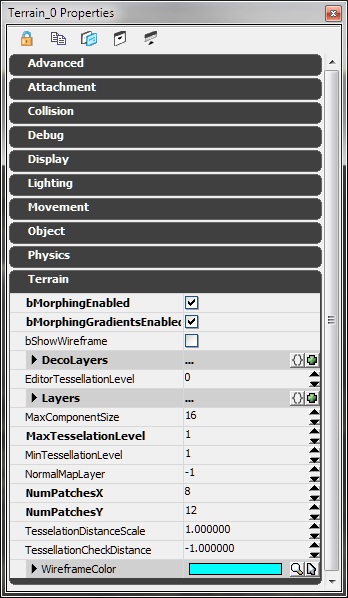
Terrain tesselation
– The MinTesselationLevel property should normally be set to the default value of 1. If it is set to the same value as the MaxTesselationLevel property, then the result is the same as setting both properties to 1, no tesselation occurs. If the MinTesselationLevel is set to a value such as one half of the MaxTesselationLevel, ie. Min = 2 and Max = 4, then the number of tesselation areas will be less and the further distance terrain will not have increased optimization quads. In other words, a Min:Max of 1:4 results in two optimized distance areas, a Min:Max of 2:4 results in only one optimized distance area.
– If the MaxTesselationLevel is set to a value other than 1 to enable the distance LOD optimization system, the values supported by NumPatches is now limited to a multiple of the MaxTesselationLevel value. For example, if MaxTesselationLevel is 4, NumPatches can be 4, 8, 12, 16, 20, 24, etc. If MaxTesselationLevel is 8, NumPatches can be 8, 16, 24, 32, 40, 48, etc. It is highly recommended to use the dynamic distance LOD tesselation optimization, even though this will limit the choice of terrain size to only multiples of the MaxTesselationLevel value. My terrain is very small & isn’t a good example but for a large terrain, it is highly recommended to follow the guidelines.
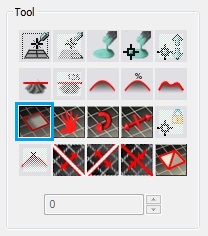
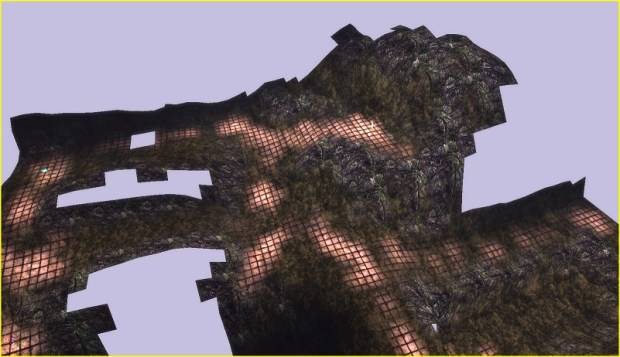
– In the terrain tool menu located in the terrain editor, the ‘Invisibility’ tool showed in the blue square permit you to hide patches of the terrain that players can’t see. Just hide the terrain patches that aren’t needed as you can see in my example.
Various
– In the Tools menu, run the ‘Clean BSP Materials‘ function to clear references held by brushes to materials for those faces that don’t exist in the final BSP.
– In the Tools menu again, run the ‘Check map for error…‘ function to be sure there is no anomalies with your level.

Thx a lot Steve for your efforts to keep this game alive!
LikeLike
THX Cosmix for your post, I greatly appreciate 😀
LikeLike
Terrain invisibility tool added. I completely forgot about it 🙂
LikeLike
Stat commands added 😀
LikeLike
One of the more detailed optimisation tutorials I’ve seen! Really nice and some things in there I didn’t know about! Thanks 🙂
LikeLike
Your welcome Pete 😀
LikeLike
its 2016 and ill stil go trough this “check list”
thanks for sharing 😀
LikeLike
I’m glad it still can be helpful 😀 THX for letting me know 🙂
LikeLike
2019 and it was really helpful.One of the few udk users on the block making a game simply because I was far too deep to change to UE4. Love the page!!
LikeLiked by 1 person